How to Choose and Use a Beauty Blender
Posted on December 06 2019
Originally the brainchild of makeup artist Rea Ann Silva, the Beautyblender is a tool that, quite frankly, revolutionized the beauty industry. Rea Ann has perfected the complexions of high-profile celebrities from Tupac to Dr. Dre, but it was being hired as the head makeup artist for the first-ever high-definition TV show that led to her lightbulb moment.
Unable to find anything that created a quick yet flawless finish, she began hand-cutting sponges into the now-famous egg shape. And soon they were disappearing into the pockets and makeup bags of everyone she worked with! Recognizing the retail potential, in 2003 Rea Ann launched her famous beauty blender that has spawned countless imitations and transformed the way women around the world apply their makeup.
We’ll explain how to choose the best beauty blender in a moment, but first let’s talk about why they’re all better than a basic sponge.
 The problem with old-school sponges
We all remember those round disc sponges that you’d get in your pressed compact from your favorite drugstore brand as a teenager. Believe it or not, those are still around. They are pretty easy to use – simply swipe your pressed powder first and then dab it onto your skin until you achieve sufficient coverage. There are even liquid compacts using this type of disc sponge nowadays.
But their uses are limited, mainly because the shape is not ideal for precision application. That’s why most of us graduated to those triangular sponges you’d also find at the drugstore. The rigid lines and points were still less-than-perfect for distributing the product evenly, however.
Plus, they stole half your makeup
For decades, this and the round disc were our only options – I remember my mother having so many of these little wedges scattered over her vanity! They were cheap, and they got the job done. But they had one major flaw. Your foundation would soak into the sponge, wasting more of it than ever ended up on your skin. Not so low-cost after all!
How to use a beauty blender: get it wet
Two things separate beauty blenders from their predecessors - their shape, yes, but also that you’re supposed to soak them in water. Say what?! Yes, really. Beauty blenders are made from a special material that, when damp, won’t absorb much of your makeup. Instead, it stays on the surface, from where it’s easily transferred to your skin.
How to choose a beauty blender shape
Unlike a simple disc sponge, you can do pretty much everything with a beauty blender. The large end smooths over foundation, the tapered point is perfect for concealer, and you can even flip it on its side to blend out those sharp lines when contouring, or to dab away excess product.
However, the original Beautyblender by Rea Ann Silva comes in multiple colors and sizes for good reason. Some of them make certain types of application particularly easy or effective. To help you choose the best beauty blender(s) for your makeup goals, we’ve broken down the most popular shapes on the market and what they’re used for.

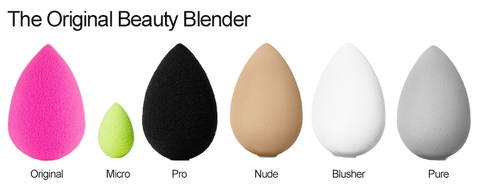
The Original Pink Beautyblender: This blender is the workhorse of beauty blenders. It’s suitable for most types of makeup application – use the larger rounded area for flawless primer and foundation, the pointed end for hard-to-reach spots such as around the nose and under the eyes, and the sides to achieve a suede-like, airbrushed texture with contour, highlighter, and powder. If you only buy one beauty blender, make it this one!
The Micro.Mini Blender: This blender is simply a miniature version of the original, about quarter the size and intended for those hard-to-reach areas. You can even use it to create your favorite smoky eye. Yes, honestly! Buy this blender if you love your eyeshadows.
The Beautyblender Pro: Otherwise known as the Black Beautyblender, there’s actually a specific purpose for this blender besides just looking chic. The color is meant to facilitate the use of darker-toned products which would be difficult to clean from a lighter-colored applicator. Use this one for darker-complexion foundations and concealers, plus long-wear makeup and self-tanners.
The Bodyblender: A super-sized beauty blender, this one makes applying sunscreen, self-tanner, and body bronzer a breeze. Choose this if you never want to have streaky legs or orange palms again!
The Beauty.Blusher: This medium-sized beauty blender is designed specifically for cream and powder blush application. Its smaller shape fits perfectly with your cheekbones, and its cool grey color helps to distinguish color undertones for perfect, naturally rosy-looking cheeks.
The Beautyblender Pure: Designed specifically for gentle application on sensitive skin, this blender also helps avoid product pilling or ‘balling’ that can sometimes occur when you mix oil- and water-based products together in your skincare and makeup routine. This blender is ideal with primers, moisturizers, eye creams, oils, SPFs, and even face masks.
Then there’s the beauty blender with a flat edge. A hybrid of the modern egg and classic flat sponge, the flat part is perfect for applying highlighters directly to your cheekbones or contour cream around the nose. This one is great if you are into an extra-polished makeup look.
 And lastly, the flocked beauty blender is perfect for powder products, especially mineral makeup. Its purpose is to simulate the kabuki brush used for heavy finishes or loose powders. It’s ideal for buffing down to create a powdery finish, or dabbing on loose power to reduce shine.
However, there is another way to clean beauty blenders that I have heard works great. Pop it into a mesh wash bag (the type you’d use for your lingerie) and put it in the machine with the rest of your laundry! Just be sure not to tumble dry it; beauty blenders should only be air-dried to avoid them melting.
Here’s how to know when to replace your beauty blender:
Unable to find anything that created a quick yet flawless finish, she began hand-cutting sponges into the now-famous egg shape. And soon they were disappearing into the pockets and makeup bags of everyone she worked with! Recognizing the retail potential, in 2003 Rea Ann launched her famous beauty blender that has spawned countless imitations and transformed the way women around the world apply their makeup.
Beauty blenders vs. standard makeup sponges
What makes a beauty blender so special? Well, the difference between a beauty blender and a standard makeup sponge is primarily the shape. The different curves and points are suited for different parts of your face, and even the color can play a role depending on the intended application. In short, each beauty blender design allows you to create a different, specific finish.We’ll explain how to choose the best beauty blender in a moment, but first let’s talk about why they’re all better than a basic sponge.
 The problem with old-school sponges
We all remember those round disc sponges that you’d get in your pressed compact from your favorite drugstore brand as a teenager. Believe it or not, those are still around. They are pretty easy to use – simply swipe your pressed powder first and then dab it onto your skin until you achieve sufficient coverage. There are even liquid compacts using this type of disc sponge nowadays.
But their uses are limited, mainly because the shape is not ideal for precision application. That’s why most of us graduated to those triangular sponges you’d also find at the drugstore. The rigid lines and points were still less-than-perfect for distributing the product evenly, however.
Plus, they stole half your makeup
For decades, this and the round disc were our only options – I remember my mother having so many of these little wedges scattered over her vanity! They were cheap, and they got the job done. But they had one major flaw. Your foundation would soak into the sponge, wasting more of it than ever ended up on your skin. Not so low-cost after all!
How to use a beauty blender: get it wet
Two things separate beauty blenders from their predecessors - their shape, yes, but also that you’re supposed to soak them in water. Say what?! Yes, really. Beauty blenders are made from a special material that, when damp, won’t absorb much of your makeup. Instead, it stays on the surface, from where it’s easily transferred to your skin.
How to choose a beauty blender shape
Unlike a simple disc sponge, you can do pretty much everything with a beauty blender. The large end smooths over foundation, the tapered point is perfect for concealer, and you can even flip it on its side to blend out those sharp lines when contouring, or to dab away excess product.
However, the original Beautyblender by Rea Ann Silva comes in multiple colors and sizes for good reason. Some of them make certain types of application particularly easy or effective. To help you choose the best beauty blender(s) for your makeup goals, we’ve broken down the most popular shapes on the market and what they’re used for.

What is the best beauty blender for me?
First up, let’s explain some of the most popular options offered by the OG beauty blender brand:
The Original Pink Beautyblender: This blender is the workhorse of beauty blenders. It’s suitable for most types of makeup application – use the larger rounded area for flawless primer and foundation, the pointed end for hard-to-reach spots such as around the nose and under the eyes, and the sides to achieve a suede-like, airbrushed texture with contour, highlighter, and powder. If you only buy one beauty blender, make it this one!
The Micro.Mini Blender: This blender is simply a miniature version of the original, about quarter the size and intended for those hard-to-reach areas. You can even use it to create your favorite smoky eye. Yes, honestly! Buy this blender if you love your eyeshadows.
The Beautyblender Pro: Otherwise known as the Black Beautyblender, there’s actually a specific purpose for this blender besides just looking chic. The color is meant to facilitate the use of darker-toned products which would be difficult to clean from a lighter-colored applicator. Use this one for darker-complexion foundations and concealers, plus long-wear makeup and self-tanners.
The Bodyblender: A super-sized beauty blender, this one makes applying sunscreen, self-tanner, and body bronzer a breeze. Choose this if you never want to have streaky legs or orange palms again!
The Beauty.Blusher: This medium-sized beauty blender is designed specifically for cream and powder blush application. Its smaller shape fits perfectly with your cheekbones, and its cool grey color helps to distinguish color undertones for perfect, naturally rosy-looking cheeks.
The Beautyblender Pure: Designed specifically for gentle application on sensitive skin, this blender also helps avoid product pilling or ‘balling’ that can sometimes occur when you mix oil- and water-based products together in your skincare and makeup routine. This blender is ideal with primers, moisturizers, eye creams, oils, SPFs, and even face masks.
 |

|
And now for the new kids on the block
Dozens – no, hundreds – of other brands have created their own version of a beauty blender, and some have innovated even further. One such product you may come across is a sponge with a tapered middle. Hold it from its ‘waist’ when you want to deliver an opaquer finish, because you’ll instinctively apply more pressure.Then there’s the beauty blender with a flat edge. A hybrid of the modern egg and classic flat sponge, the flat part is perfect for applying highlighters directly to your cheekbones or contour cream around the nose. This one is great if you are into an extra-polished makeup look.
 And lastly, the flocked beauty blender is perfect for powder products, especially mineral makeup. Its purpose is to simulate the kabuki brush used for heavy finishes or loose powders. It’s ideal for buffing down to create a powdery finish, or dabbing on loose power to reduce shine.
How to clean a beauty blender
There are numerous different methods of cleaning your beauty blender. Most people have their own cleaning solutions but the process is the same. Soak the blender first, apply your cleaning solution, and rinse until the excess product is removed. It’s as easy as that.However, there is another way to clean beauty blenders that I have heard works great. Pop it into a mesh wash bag (the type you’d use for your lingerie) and put it in the machine with the rest of your laundry! Just be sure not to tumble dry it; beauty blenders should only be air-dried to avoid them melting.
When to throw away a beauty blender
Everyone gets attached to their makeup tools but a beauty blender is not meant to be kept for forever, or even for more than a few months. I admit, I’m guilty – I regularly clean my blenders but forget to toss them when its time. However, even with thorough cleaning, you’ll gradually get product build-up.Here’s how to know when to replace your beauty blender:
- After 3 months. You generally have 3 months to use your blender if you use it every day. If you only use it occasionally then it will have longer life-span, but it’s still not forever.
- It’s disintegrating. Small chunks coming off onto your skin? If you start to see it fall apart, it’s time to get rid of it.
- Unexplained breakouts. If you start to break out for no reason then guess what, your blender is the reason. It has become too dirty to clean so don’t put it on your face, put it in the trashcan.
- Impossible to clean. If most of the product is not coming out when you try to clean it, and your blender looks permanently discolored, that’s also a sign it’s past its best.


